 Creating Your First Engagement: Complete Walkthrough
Overview
What you'll learn:
- How to create an engagement using templates or from scratch
- Setting up scope and rules of engagement properly
- Defining objectives that drive your testing
- Using AI-assisted planning to generate execution workflows
- Understanding the transition from planning to active operations
- Navigating to execution monitoring and reporting
Time required: 20-25 minutes
Difficulty: Beginner
Prerequisites: Access to StrikeKit through Strike48 Studio
Need Help?
Remember: StrikeKit's Assistant can guide you through creating anything in the system. Just navigate to Headquarters → Assistant and ask questions like:
- "How do I create a new engagement?"
- "Walk me through setting up scope"
- "What should my objectives be for an internal pentest?"
The Assistant understands your context and will guide you step-by-step through any process.
Part 1: Understanding Your Options
Starting from the Dashboard
When you first access StrikeKit with no active engagement selected, you'll see the Mission Dashboard with a prominent call-to-action.
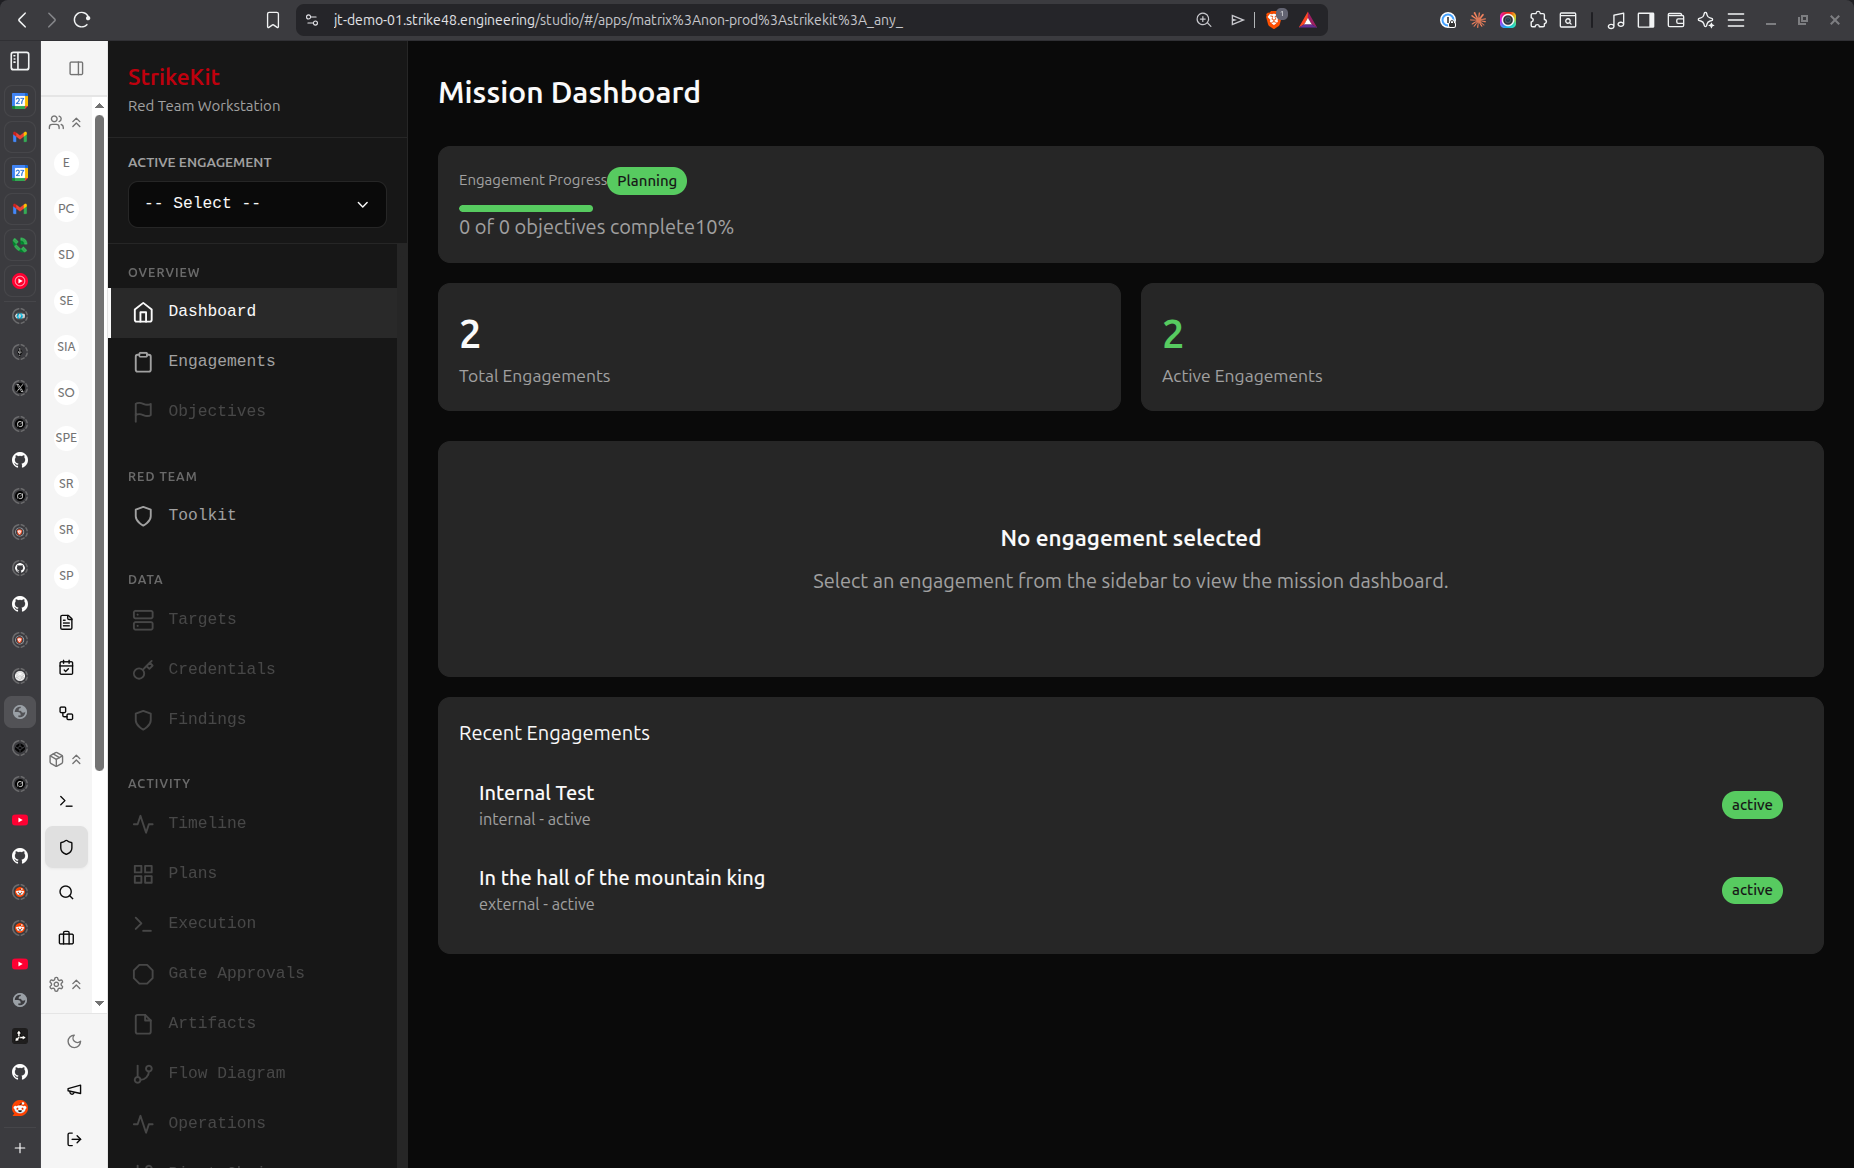 Dashboard showing no engagement selected with "New Engagement" button
Key elements:
- Kill Chain Progress - Shows attack phase distribution (empty until you have active operations)
- Engagement Statistics - Shows total and active engagements
- New Engagement button - Primary path to create an engagement
- Active Engagement dropdown - Located in the sidebar to select existing engagements
From here you have three options:
- New Engagement (Wizard) - Guided step-by-step creation (recommended for first-time users)
- Quick Start - Advanced users only, creates engagement with incomplete setup
- Ask the Assistant - Conversational guidance through the entire process
For this tutorial, we'll use the New Engagement wizard to show you every option available.
The Engagements List
Click Headquarters → Engagements in the sidebar to see all your engagements.
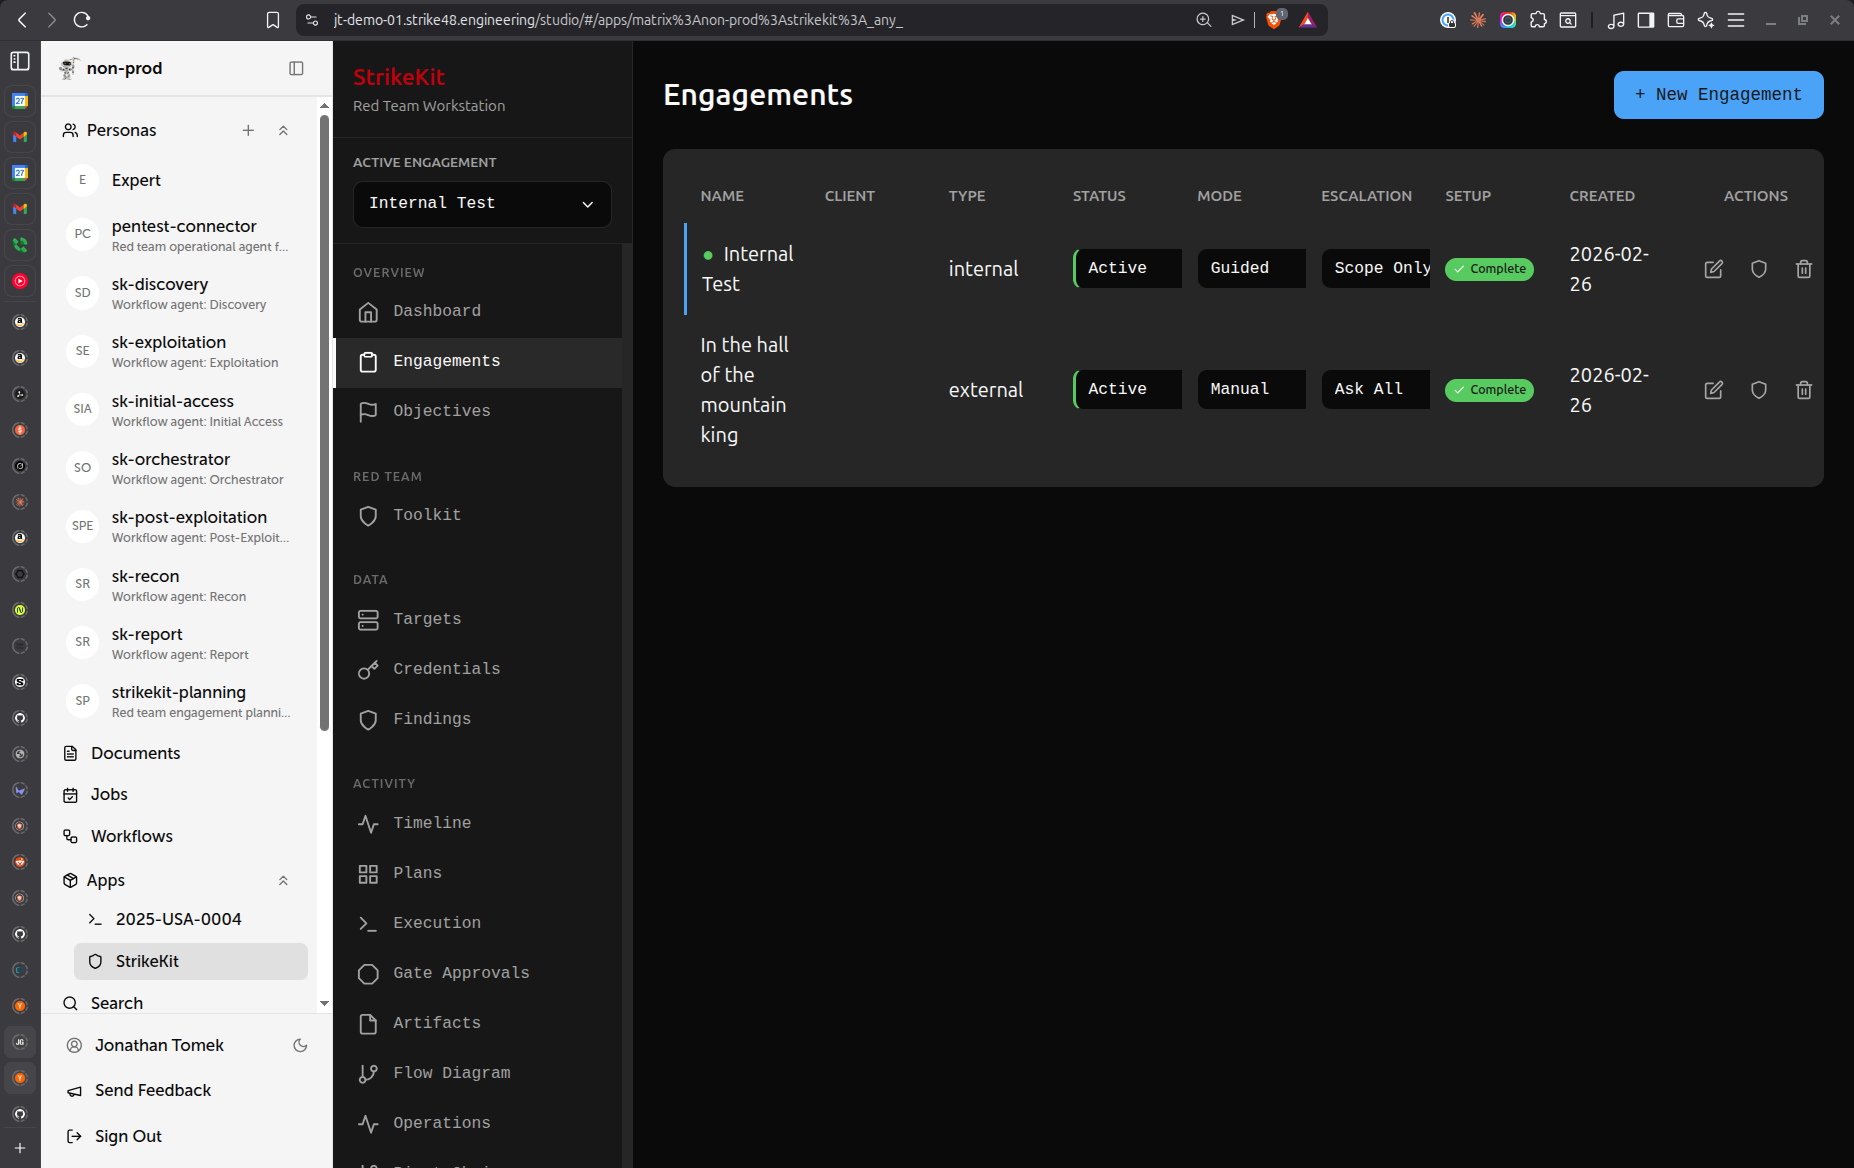 Engagements list showing existing engagements with configuration options
Understanding the columns:
- Name - Engagement identifier
- Client - Organization being tested
- Type - Engagement methodology (internal, external, web app, etc.)
- Status - Current phase (Planning, Active, Paused, Complete, Archived)
- Mode - Operating mode:
- Manual - You control every action
- Guided - AI guides you through recommended steps
- Autonomous - AI executes with your oversight
- Escalation - Approval requirements:
- Ask Everything - Approve every action (maximum control)
- Scope Changes Only - Approve only scope violations
- Notify Only - System notifies without requiring approval
- Setup - Setup completion status
- Created - Creation date
- Actions - Edit, view, or delete engagement
Two paths from here:
- New Engagement (blue button, top-right) - Opens the wizard
- Quick Start (outlined button) - For advanced users who want minimal setup
Choosing a Template
Click New Engagement to open the wizard. The first screen lets you choose a template.
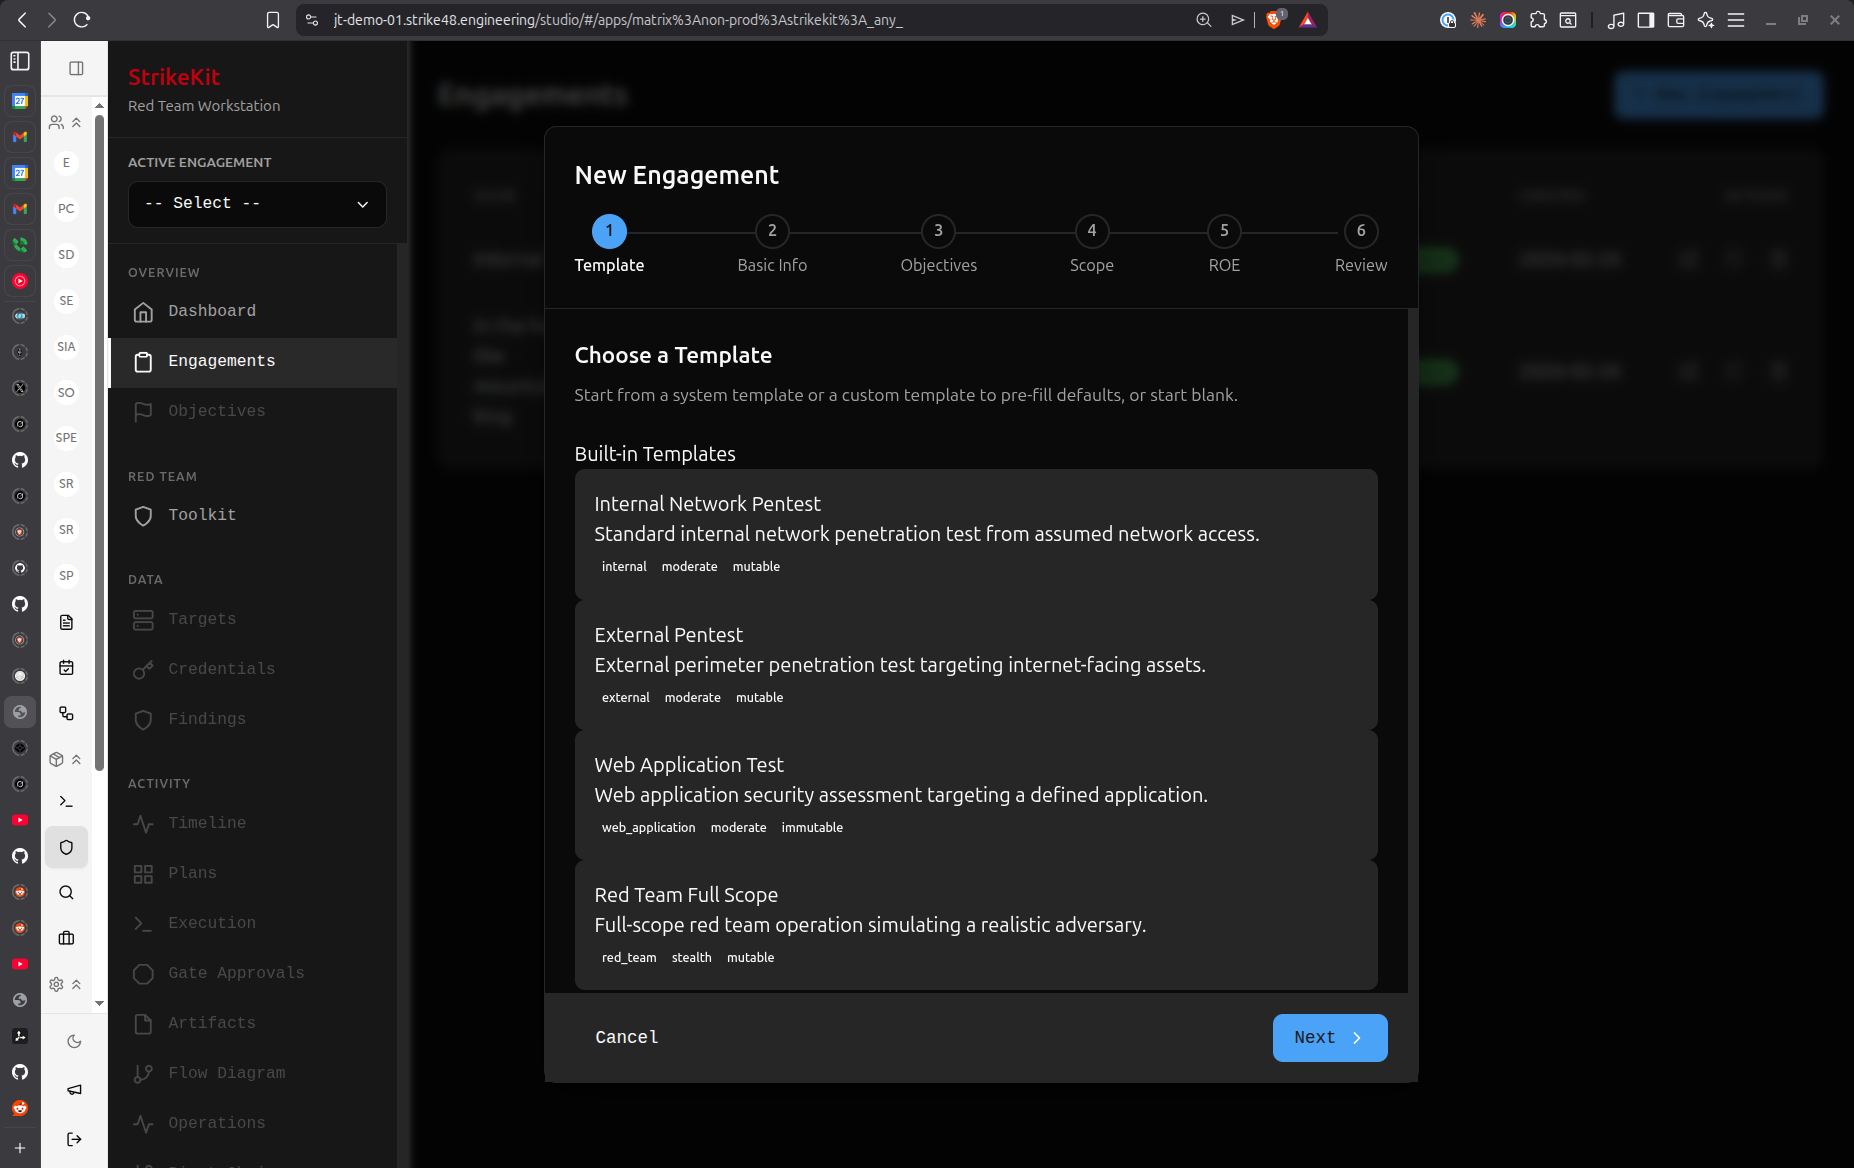 Template selection dialog showing available engagement templates
What are templates?
Templates are pre-configured engagement setups that automatically fill in:
- Basic information fields
- Suggested objectives
- Scope categories
- Default ROE settings
- Common prohibited actions
Six default templates ship with StrikeKit:
- Internal Network Pentest - Standard internal infrastructure testing
- Red Team Full Scope - Comprehensive adversary simulation
- External Pentest - Internet-facing systems and services
- Internal Red Team - Internal adversary emulation
- Web App Assessment - Web application security testing
- Web Application Test - Focused web app vulnerability assessment
Template vs. Manual:
- Use a template if you're doing a standard engagement type
- Skip template if you want complete control from scratch
- You can always customize template settings in the wizard
Creating custom templates:
After creating an engagement manually, you can:
- Export it as a template
- Clone it for similar engagements
- Share templates with your team
For this walkthrough, let's select Internal Network Pentest.
Part 2: The Engagement Wizard
After selecting a template (or choosing to skip templates), you'll enter the 5-step wizard. A progress indicator at the top shows where you are.
 Wizard progress indicator: Template → Basic Info → Objectives → Scope → ROE → Review
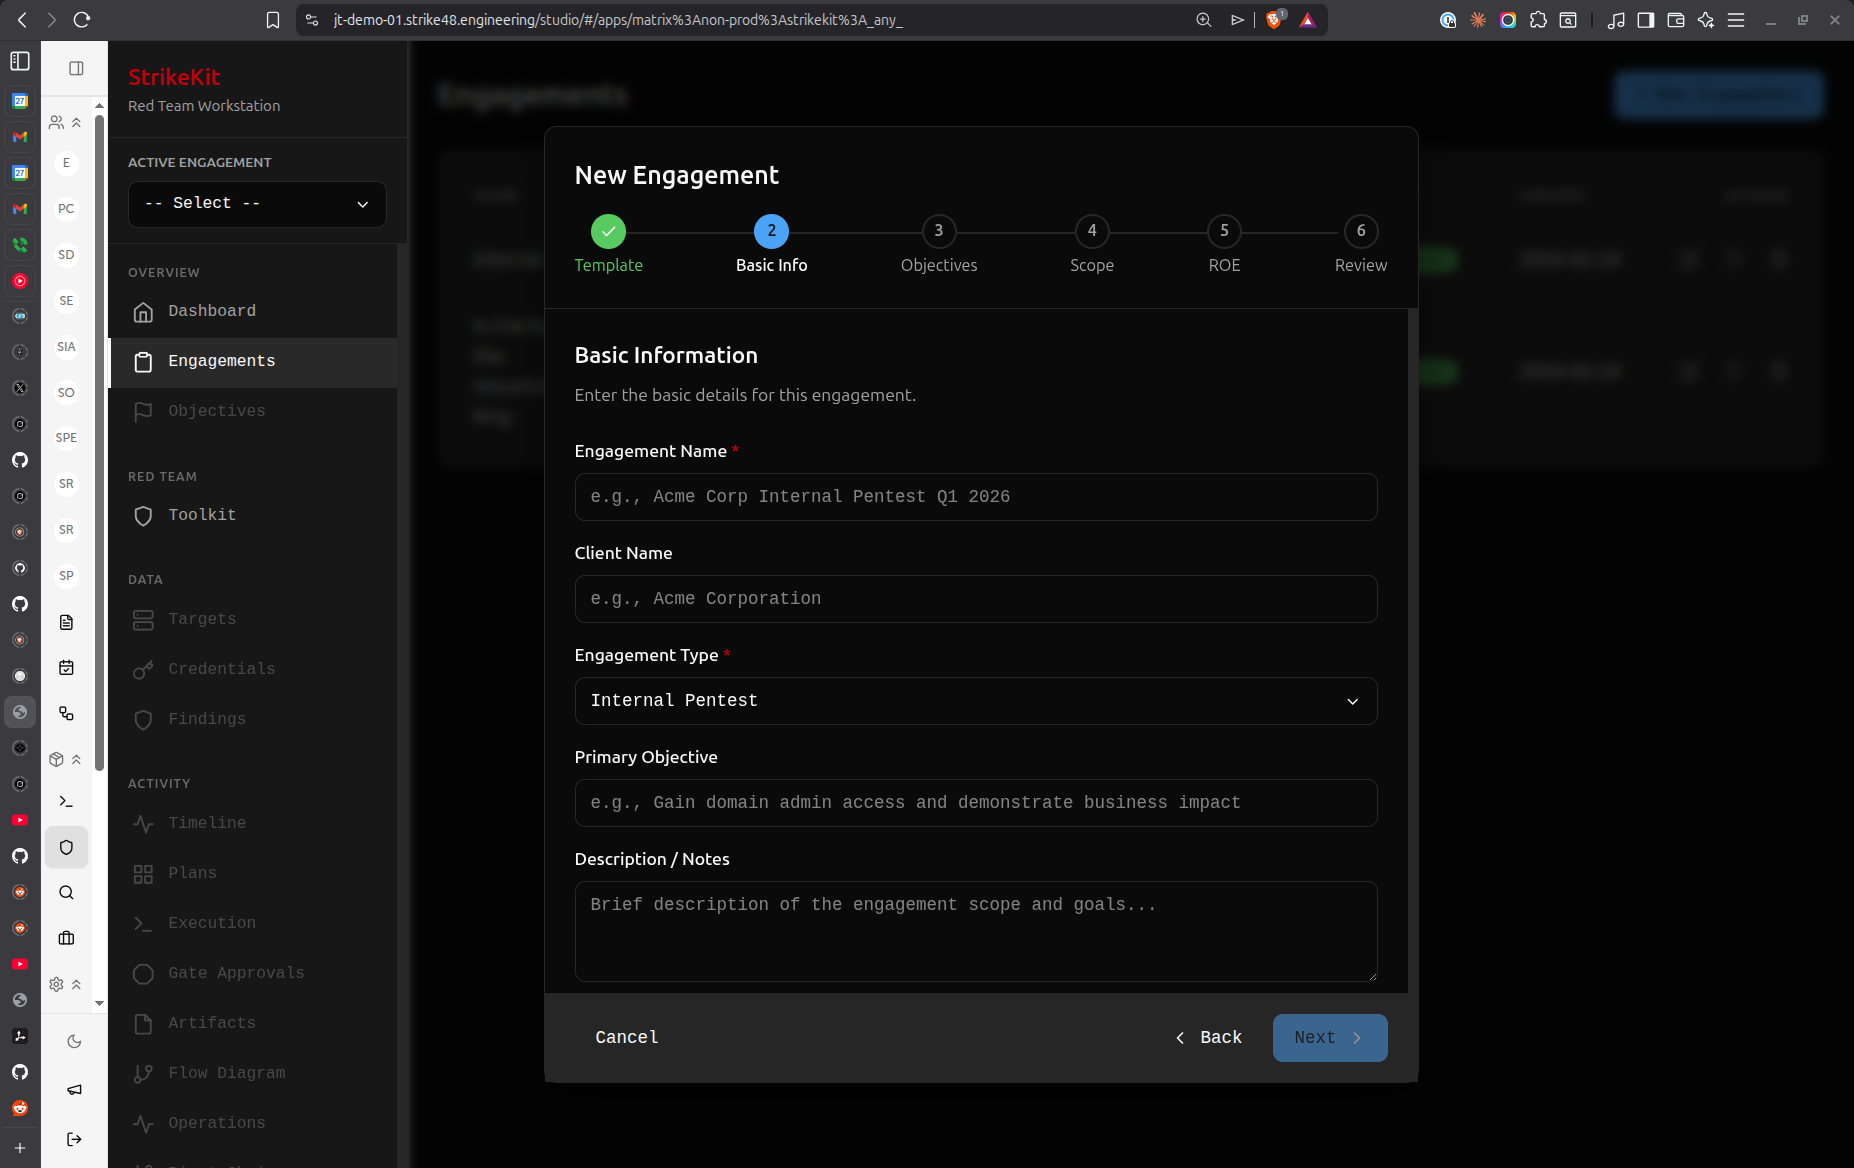
Step 1: Basic Information
This step captures core engagement details.
Basic information form with engagement details
Required fields:
Engagement Name
- Clear, descriptive identifier
- Include client name and date for easy reference
- Example:
Acme Corp Internal Pentest Q1 2026
Client Name
- Organization being tested
- Example:
Acme Corporation
Engagement Type
- Pre-filled from template or select from dropdown
- Options: Internal Pentest, External Pentest, Web Application Testing, Social Engineering, Physical Security Assessment
Primary Objective
- High-level goal for the engagement
- This becomes an objective automatically
- Example:
Gain domain admin access and demonstrate business impact
Description / Notes
- Context about the engagement
- Scope overview
- Special considerations or client requests
- Example:
Testing internal network security posture. Focus on Active Directory and critical business systems.
Best practices:
- Use consistent naming conventions across engagements
- Be specific in the primary objective
- Include relevant context in the description
- Reference any authorization documents (SOW, contract numbers)
Click Next to proceed to objectives.
Step 2: Objectives
Objectives define what you're trying to accomplish during the engagement. At least one objective is required before you can start an engagement.
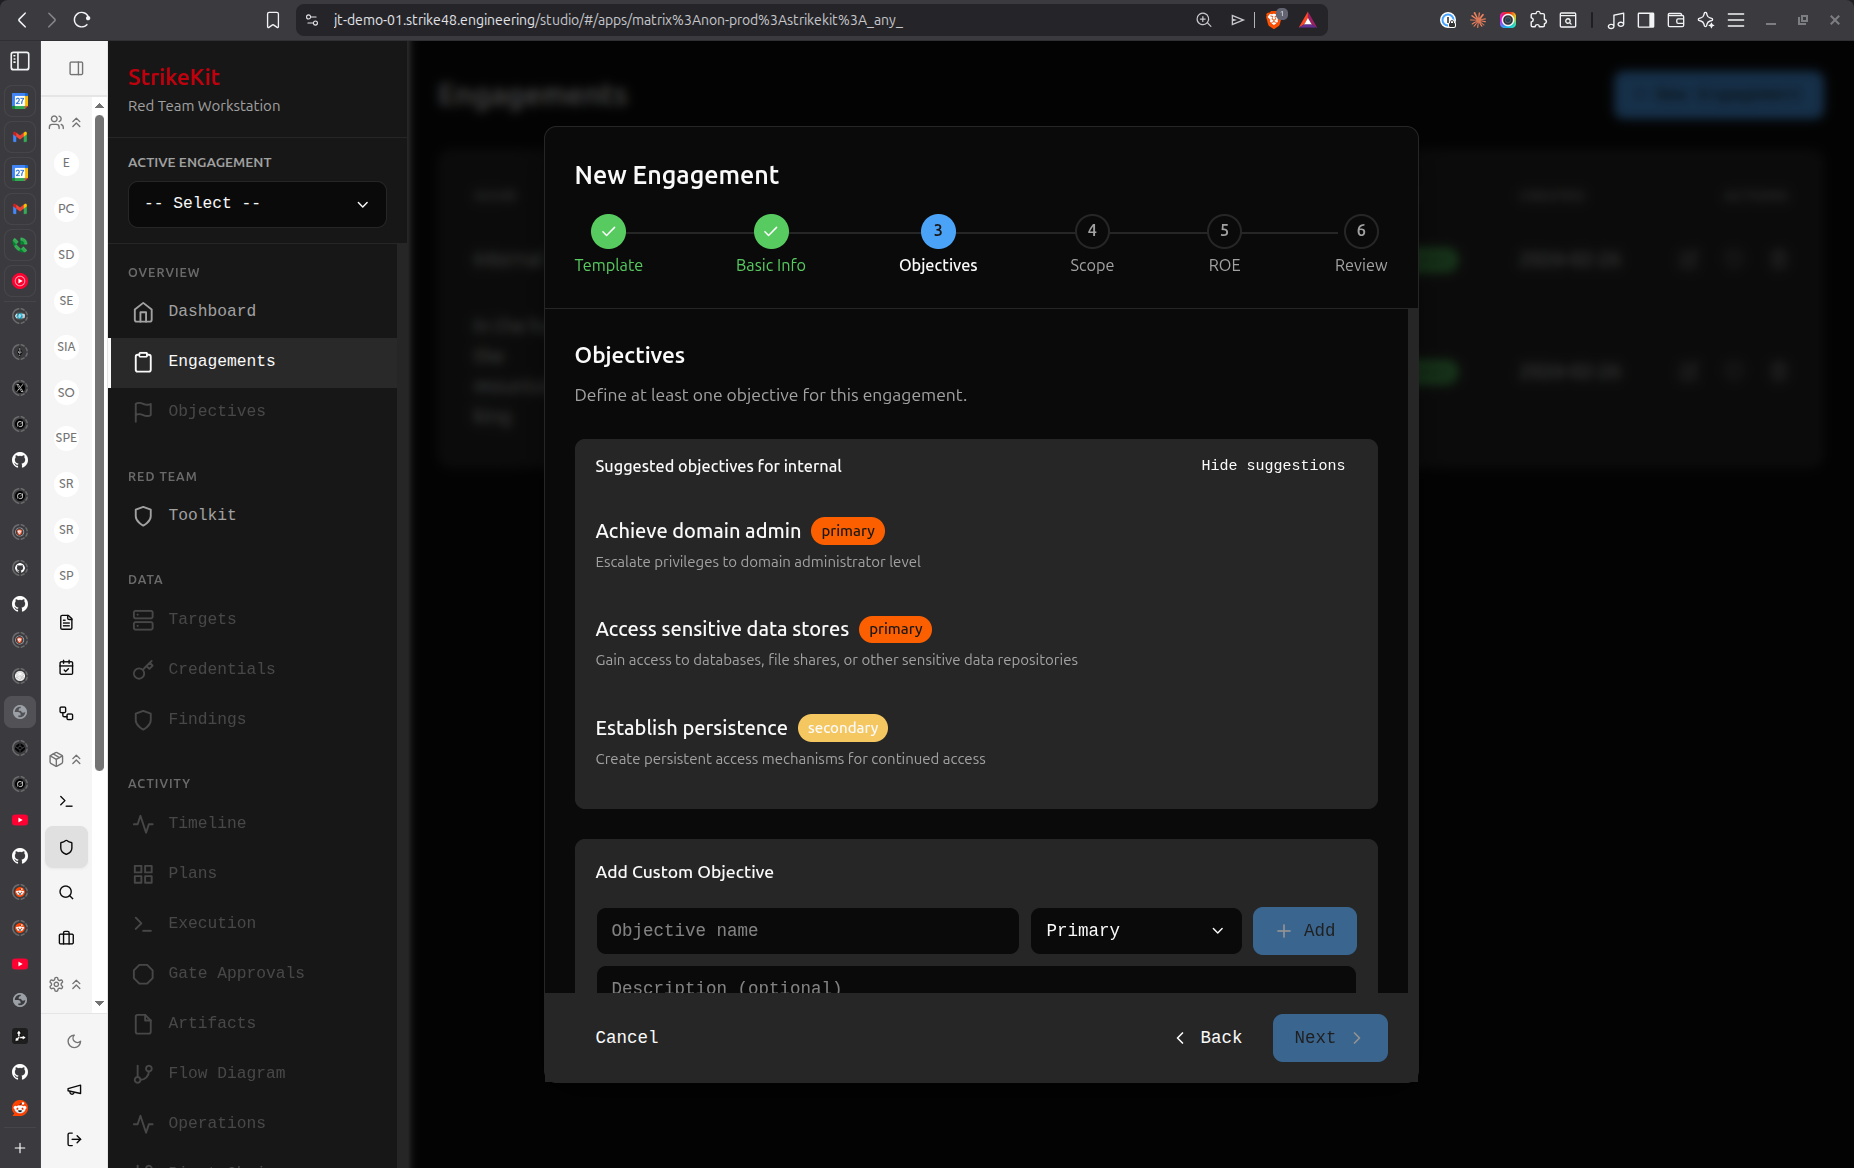 Objectives step with AI-suggested objectives based on engagement type
Understanding objectives:
Objectives serve multiple purposes:
- Guide your testing activities
- Measure engagement success
- Provide structure for reporting
- Keep operations focused and in scope
AI-Suggested Objectives:
Based on your selected template (Internal Network Pentest), StrikeKit suggests relevant objectives:
- Achieve domain admin (primary) - Escalate privileges to domain administrator level
- Access sensitive data stores (primary) - Gain access to databases, file shares, or other sensitive data repositories
- Establish persistence (secondary) - Create persistent access mechanisms for continued access
- Map internal network (secondary) - Discover and document internal network topology and trust relationships
Priority levels:
- Primary - Core objectives that define engagement success
- Secondary - Nice-to-have goals that demonstrate additional risk
Adding custom objectives:
Click New Objective to add your own:
- Enter objective title (e.g., "Exfiltrate customer database")
- Set priority (primary or secondary)
- Optionally add description with success criteria
Best practices:
- Set objectives in the wizard - It's easier than adding them later
- Be specific and measurable - "Gain domain admin" not "Break security"
- Align with client goals - What are they worried about?
- Balance primary and secondary - Don't make everything primary
- Link to business impact - How does achieving this objective hurt the business?
Can I add objectives later?
Yes! You can always add, edit, or remove objectives by navigating to Mission → Objectives after creating the engagement. However, you must have at least one objective before you can execute the engagement.
Click Next to proceed to scope definition.
Step 3: Scope & Targets
Scope definition is critical for staying within authorization boundaries. This step helps you clearly define what's in scope, what's acceptable, and what's strictly prohibited.
 Scope definition with primary, secondary, and out-of-scope categories
Understanding Scope Categories:
StrikeKit uses a three-tier categorization system with visual color coding:
Primary (Expected) - Green
- Core targets you're expected to test
- Main focus of the engagement
- Examples shown:
privilege_escalation,credential_access,discovery,lateral_movement
Secondary (Acceptable) - Orange
- Targets that are acceptable to test if discovered
- Opportunistic targets within authorization
- Examples shown:
reconnaissance,resource_development,initial_access,execution,persistence,defense_evasion,command_and_control,exfiltration
Out of Scope - Red
- Strictly prohibited targets
- Testing these requires explicit client approval
- Examples shown:
initial_access,impact
Adding Targets:
In-Scope Targets (IPs, CIDRs, domains):
- Enter IP addresses, CIDR ranges, or domain names
- Example:
192.168.1.0/24or*.example.com - Click Add to include in scope
- These become targets you can test freely
Out-of-Scope Targets:
- Systems explicitly excluded from testing
- Production databases, backup systems, etc.
- Example:
10.0.0.1orprod.example.com - StrikeKit will warn if you attempt to interact with these
Blackout Periods:
Define time windows when testing is not allowed:
- Weekends
- Business hours
- Maintenance windows
- Holidays
During blackout periods, StrikeKit blocks execution - it's a hard stop, not just a warning.
To add a blackout period:
- Scroll to the Blackout Periods section
- Click Add Period
- Set start and end date/time
- Optionally add a description (e.g., "Holiday weekend")
Mutability Setting:
At the bottom, you'll see Mutability: mutable (or immutable)
- Mutable - Scope can be modified during the engagement (for exploratory testing)
- Immutable - Scope is locked (for compliance-driven engagements)
When to use immutable scope:
- Compliance testing (PCI-DSS, ISO 27001)
- Contracts with strict scope clauses
- Client requires no scope changes without approval
Best practices:
- Be explicit about scope - "Everything in 192.168.1.0/24" not "the network"
- Document exclusions clearly - Prevent accidental testing of sensitive systems
- Use categories appropriately - Primary = must test, Secondary = may test, Out-of-scope = don't test
- Set blackout periods early - Avoid scheduling conflicts
- Choose immutable for compliance - Lock down scope when required
Click Next to proceed to Rules of Engagement.
Step 4: Rules of Engagement (ROE)
Rules of Engagement define the operational parameters, constraints, and communication protocols for your engagement.
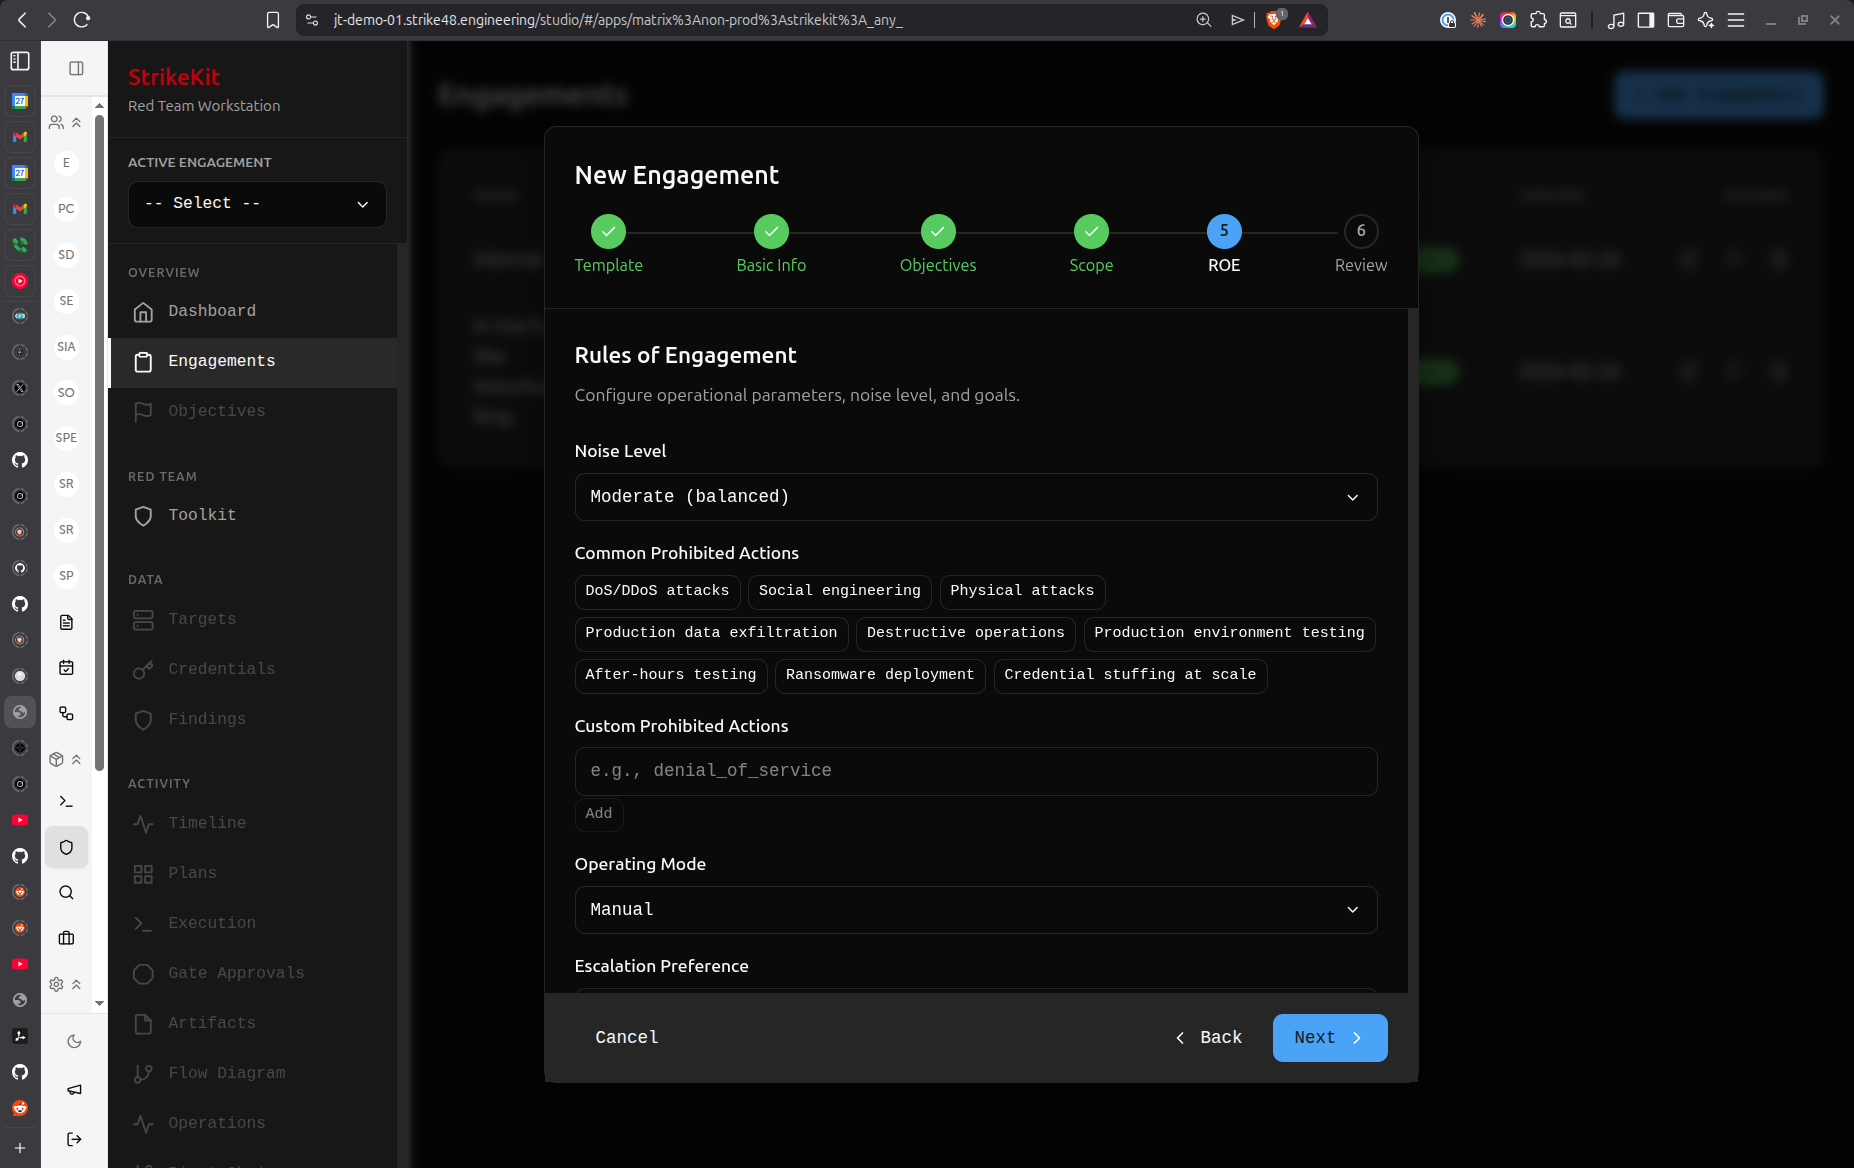 ROE configuration with noise level, prohibited actions, and operating mode
Noise Level:
Controls how stealthy your operations should be:
- Silent - Minimal detectability, evade monitoring (covert operations)
- Quiet - Low profile, avoid obvious detection
- Moderate (Balanced) - Normal testing activity, some detection expected
- Loud - Obvious testing, maximum coverage over stealth
The Covert template automatically sets noise level to Silent.
Common Prohibited Actions:
Check the boxes for actions that are explicitly prohibited:
- ☑ DoS/DDoS attacks
- ☑ Social engineering
- ☑ Physical attacks
- ☑ Production data exfiltration
- ☑ Destructive operations
- ☐ Production environment testing
- ☐ After-hours testing
- ☐ Ransomware deployment
- ☐ Credential stuffing at scale
Custom Prohibited Actions:
Add specific prohibitions for your engagement:
- Example:
denial_of_service,data_destruction - These appear as tags and are enforced through approval gates
Operating Mode:
Choose how much system assistance you want:
- Manual - You control every action (maximum control)
- Guided - AI guides you through recommended steps
- Autonomous - AI executes with your oversight
This can be changed later via the Engagements screen.
Escalation Preference:
How should StrikeKit handle approval requests?
- Ask Everything - Approve every action (maximum oversight)
- Scope Changes Only - Approve only out-of-scope activities
- Notify Only - System notifies without requiring approval
Additional ROE Fields:
Notification Requirements:
- Who to notify and when during the engagement
- Example: "Notify SOC lead before privilege escalation attempts"
Emergency Contact:
- Name and phone number for urgent issues
- Example:
John Doe +1-555-0100
Authorization Reference:
- SOW number, contract reference, or approval document
- Example:
SOW-2026-001orContract-ABC-123
Success Criteria:
- How you'll measure engagement success
- Different from objectives - this is about the engagement quality itself
- Example: "Comprehensive methodology, detailed documentation, executive-friendly report"
Best practices:
- Match noise level to engagement type - Covert = Silent, Standard Pentest = Moderate
- Be explicit about prohibitions - Avoid misunderstandings with the client
- Choose appropriate operating mode - Start with Guided if you're new to StrikeKit
- Set escalation based on risk - High-risk environments = Ask Everything
- Include emergency contact - Critical for real-time issues
- Reference authorization - Link to the document that authorizes testing
Click Next to review your engagement configuration.
Step 5: Review & Create
The final step shows a summary of all your configuration choices. Review carefully before creating the engagement.
Review Sections:
Basic Info
- Name: Demo 1
- Client: Demo
- Type: internal
- Primary Objective: Gain Root Access
Objectives (1)
- secondary: Map internal network
Scope
- Activity Primary: 4 categories
- In-Scope Targets: 1 entries
- Out-of-Scope: 1 entries
- Mutability: mutable
ROE
- Noise Level: moderate
- Operating Mode: manual
- Escalation: ask_everything
- Prohibited Actions: 2 rules
What to verify:
- Engagement name is clear and descriptive
- All required objectives are present
- Scope accurately reflects authorization
- Out-of-scope exclusions are correct
- ROE settings match client expectations
- Emergency contact information is accurate
Two options:
- Back - Return to previous steps to make changes
- Create Engagement (green button) - Create the engagement and proceed to planning
What happens when you click Create Engagement?
- Engagement is created with status = Planning
- You're taken to the Engagement Planning view
- A pre-planning checklist validates your setup
- You can begin AI-assisted planning
Click Create Engagement to proceed!
Part 3: AI-Assisted Planning
After creating your engagement, StrikeKit automatically takes you to the AI-assisted planning phase. This is where the system helps you develop a comprehensive execution plan.
Pre-Planning Checklist
Before generating your plan, StrikeKit validates that all required setup is complete.
The checklist validates:
- Engagement name defined
- Engagement type selected (Current type: internal)
- In-scope targets defined
- Out-of-scope exclusions reviewed
- Primary objective defined
- Operating mode selected (Current mode: manual)
Checklist shows: "8 / 8 items completed" with a progress bar
Why this matters:
The AI plan generator uses this information to create a tailored execution plan. Missing information results in a generic plan that won't be as useful.
If items are incomplete:
- Click on the checklist item to jump to that section
- Update the engagement configuration
- Return to planning when complete
When checklist is complete:
A button appears: "Generate AI-powered engagement plan"
This kicks off the AI planning process where you'll collaborate with an agent to refine your plan.
Collaborating with the Planning Agent
Once you click to generate the plan, you enter an interactive planning session with an AI agent.
Understanding the Planning Interface:
Left Panel - Agent Chat:
- Conversational interface with the planning AI
- You can ask questions, request changes, challenge assumptions
- Example questions:
- "Can you add more detail to the reconnaissance phase?"
- "What tools do you recommend for privilege escalation?"
- "How should we approach Active Directory enumeration?"
Right Panel - Generated Plan:
The AI creates a structured engagement plan with multiple phases:
Plan v1 (shown with green "Active" badge)
Phase 1: Internal Reconnaissance
- Conduct passive and active reconnaissance
- Time: 1-2 days (8-16 hours)
- Key activities:
- Network discovery (ARP, ICMP, passive DNS)
- Host discovery through network sweeps
- Service enumeration (ports, protocols, banners)
- SMB enumeration for shares and users
Phase 2: Find & Scrub Scan Avail Hostal
- Example: "Post & Scrub Scan Avail Hostal" or similar phases
- Details about scanning and enumeration activities
Phase 3: C2 Engagement
- Establish command and control infrastructure
- Deploy agents on compromised systems
Phase 4: Data Enumeration
- Details about data discovery and collection
Raw Plan Data (Left Sidebar in Screenshot 11):
- JSON representation of the generated plan
- For advanced users who want to see the structure
- Will be cleaned up in future versions
Refining Your Plan
The planning agent is interactive - you can refine the plan through conversation.
How to refine:
- Review the generated plan - Read through each phase
- Ask for clarification - "What specific tools for network discovery?"
- Request modifications - "Add a web application testing phase"
- Challenge assumptions - "We don't have physical access, remove that phase"
- Add constraints - "We can only test during business hours"
The agent will:
- Answer your questions with context-aware responses
- Modify the plan based on your feedback
- Explain reasoning behind recommendations
- Suggest alternatives when you raise concerns
Example interactions:
You: "This seems too aggressive for a moderate noise level" Agent: "You're right. I'll adjust the scanning approach to be more gradual and add delays between requests..."
You: "What about Active Directory attacks?" Agent: "Great point. Let me add a dedicated AD enumeration and exploitation phase..."
Iterating:
You can go back and forth with the agent multiple times until the plan meets your needs.
Viewing Options:
Notice the tabs at the top:
- Status - Overall planning status
- Draft - Current draft of the plan
- Execute Plan - Ready to commit the plan (appears when satisfied)
Flow View (Visualizing Execution Steps)
In addition to the text-based plan, you can view the execution workflow visually.
Flow View shows:
- Sequential steps StrikeKit will take
- Dependencies between phases
- Decision points and approval gates
- Estimated time for each phase
This helps you understand exactly what will happen when you execute the engagement.
To access Flow View:
- Look for a "Flow" or "Workflow" tab in the planning interface
- Toggle between text and visual representations
Pushing Objectives
When you're satisfied with the plan, it's time to commit it to the engagement.
The "Push Objectives" action:
- Takes the AI-suggested objectives from the plan
- Adds them to your engagement's Objectives list (Mission → Objectives)
- Commits the plan as the execution workflow
Important notes:
- One-time at the beginning - Initial push creates the objectives
- Can be modified after - You can edit objectives in the Objectives view
- Can push again - If you make major changes to the engagement, you can regenerate and push again
What happens after pushing:
- Objectives appear in Mission → Objectives
- The plan becomes the execution workflow
- You're ready to add any additional intelligence before execution
Before executing:
This is a good time to:
- Add known credentials to Analysis → Credentials
- Pre-populate known targets in Intelligence → Targets
- Review and update any engagement details
- Ensure your testing infrastructure is ready
Part 4: From Planning to Execution
Starting Execution
When you're ready to begin active operations, you'll initiate execution. This transitions the engagement from Planning status to Active status.
To start execution:
- Click the Execute button (location: in the engagement plan or from Mission → Execution)
- Confirm you're ready to begin
- Engagement status changes to Active
- Execution workflow begins
Execution Monitor
Once execution starts, you can monitor progress in real-time.
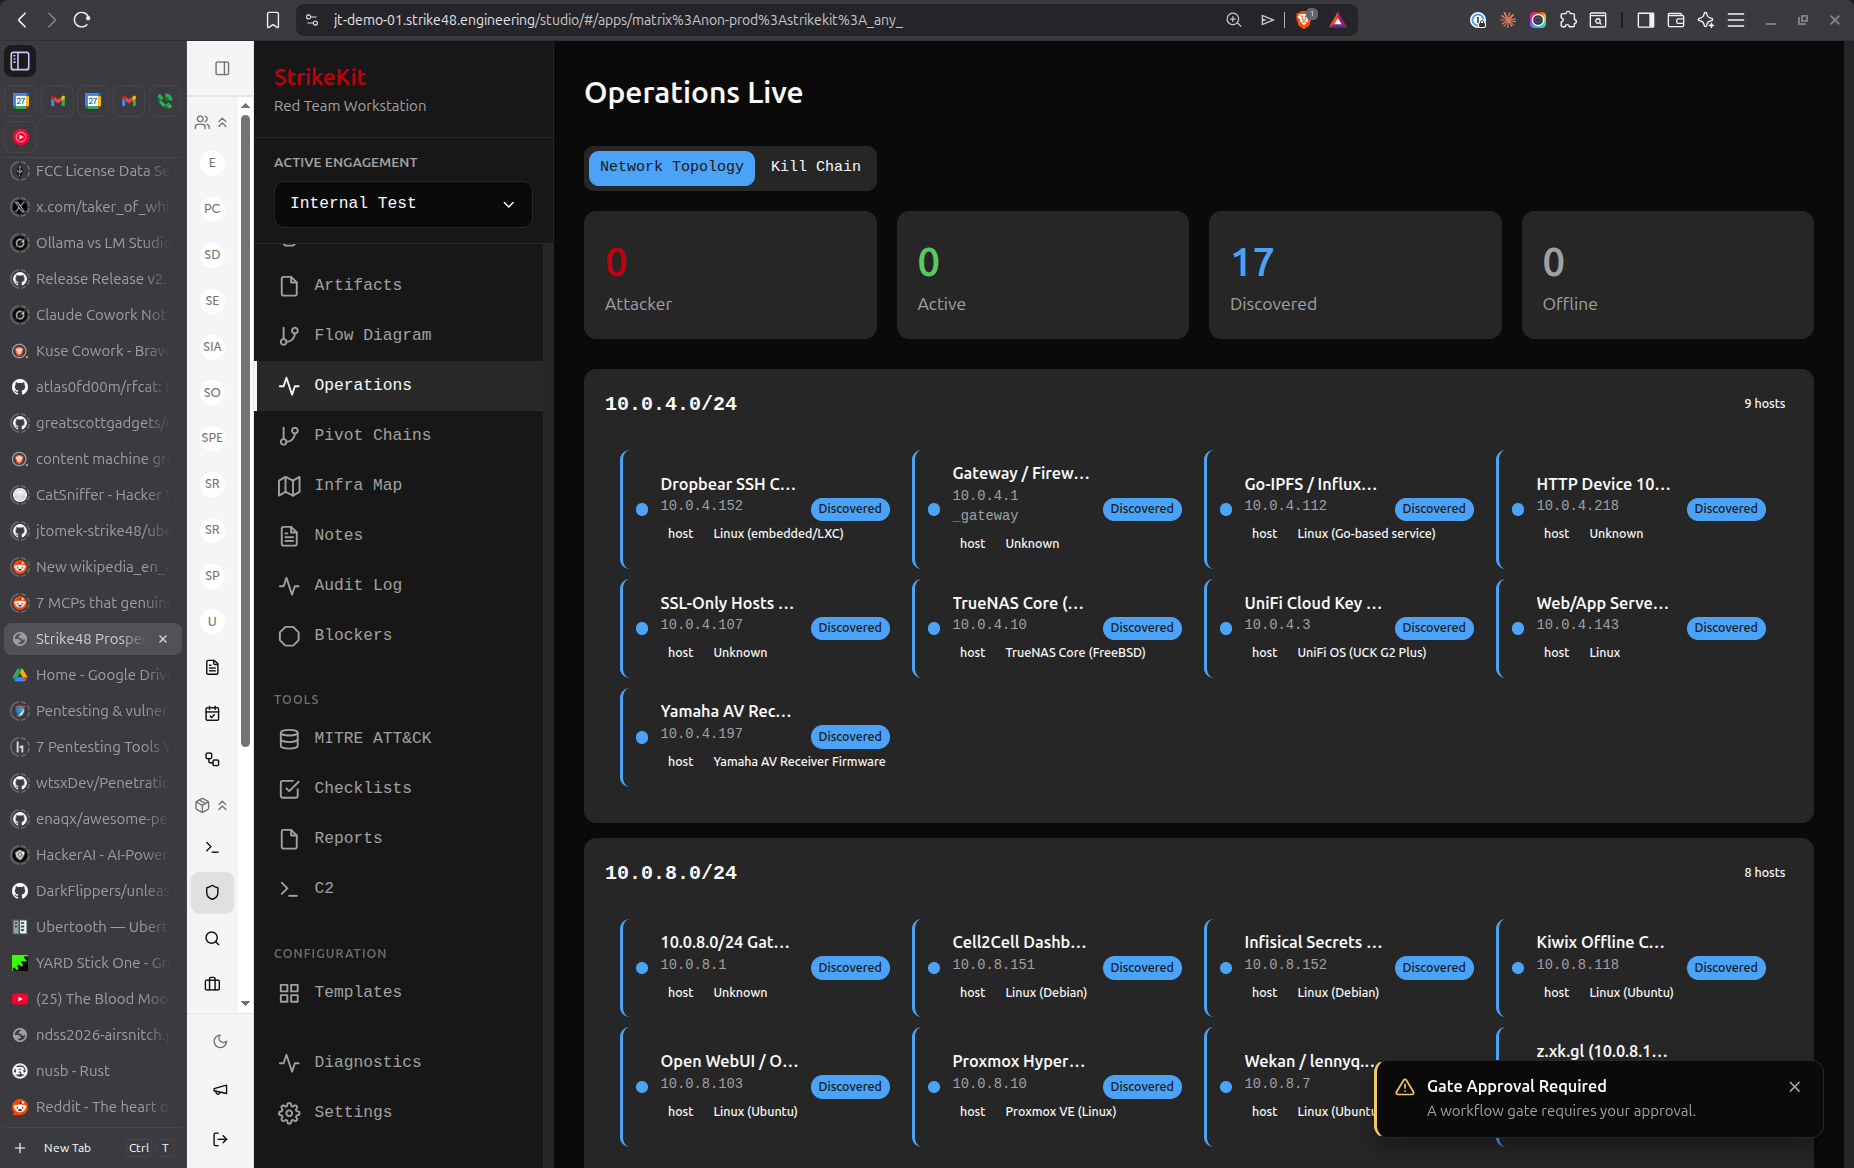 Real-time execution monitoring with workflow status and activity logs
Understanding the Execution Monitor:
Left Sidebar - Workflow Tasks:
The AI-generated plan becomes a task list:
-
- Audit Control for Internal Rec... (Complete)
- 🟠 Mobile Device Reconnaissance (In Progress)
- ⚪ Build Context for Vulnerability... (Pending)
- ⚪ Vulnerability Assessment (Pending)
- ⚪ Initial Access & Establishment (Pending)
- ⚪ Validate Initial Access & Exploi... (Pending)
- ⚪ Lateral Movement & Credential... (Pending)
Status indicators:
-
- Green checkmark = Complete
- 🟠 Orange dot = In Progress
- ⚪ Gray dot = Pending
Right Panel - Current Activity:
Shows detailed information about the current task:
- Activity description
- Current status
- Logs and output
- Any approval requests
Engagement Context (Bottom Right):
- Engagement name
- Engagement type
- Current status
- Active targets
What you can do:
During execution, you can:
- Monitor progress through the workflow
- Review activity logs
- Approve actions (based on your Escalation setting)
- Add targets, credentials, or findings as you discover them
- Take manual control if needed
Operating Mode Impact:
Remember your Operating Mode setting affects behavior:
- Manual - You trigger each action explicitly
- Guided - System guides you through recommended steps
- Autonomous - System executes automatically with your oversight
Escalation Handling:
Based on your Escalation setting:
- Ask Everything - You'll approve each action
- Scope Changes Only - Only out-of-scope activities require approval
- Notify Only - System proceeds and notifies you
Future capability: You'll be able to reorder or modify the workflow during execution.
Tracking Progress
As execution continues, StrikeKit automatically tracks:
- Kill Chain progression - Updates in real-time (Recon → Discovery → Exploitation → Post-Exploitation)
- Timeline events - Major milestones logged chronologically
- Audit log - Every action recorded for complete audit trail
- Findings - Document vulnerabilities as you discover them
- Evidence - Capture screenshots and proof
- Credentials - Store discovered credentials
- Targets - Track compromised vs discovered systems
Monitoring views:
- Mission → Execution - Real-time workflow progress
- Tracking → Kill Chain - Attack phase distribution
- Tracking → Timeline - Chronological event log
- Tracking → Audit Log - Complete action history
- Analysis → Findings - Discovered vulnerabilities
Generating Reports
Throughout and after the engagement, you can generate reports.
Report Types:
AI Executive Summary
- High-level overview for non-technical audiences
- Automatically generated from engagement data
- Shows engagement type, status, dates
- Summarizes security posture and key findings
Internal Test - Penetration Test Report
- Comprehensive technical report
- Executive Summary section
- Detailed findings with evidence
- Methodology documentation
- MITRE ATT&CK coverage
Report Actions:
- Generate (blue button) - Create the report
- Download (green button) - Export as PDF
- Next Sec - Navigate to next section
- Export PDF - Alternative export option
- Export HTML - Web-friendly format
What's included:
Reports automatically pull from:
- Engagement details (scope, ROE, dates)
- Objectives and their completion status
- Findings with severity ratings
- Evidence attachments
- Activity logs and timeline
- MITRE ATT&CK technique coverage
- Network topology visualizations
When to generate reports:
- During engagement - Status updates for clients
- After completion - Final deliverable
- Multiple formats - Executive summary + technical details
Conclusion & Next Steps
Congratulations! You've learned the complete engagement lifecycle in StrikeKit, from creation through execution to reporting.
What You've Learned
- Creating engagements - Templates vs manual, wizard flow
- Setting scope - In-scope, out-of-scope, blackout periods
- Defining objectives - Primary and secondary goals
- Rules of engagement - Noise level, operating mode, escalation
- AI-assisted planning - Generating and refining execution plans
- Execution monitoring - Real-time workflow tracking
- Report generation - Executive and technical deliverables
Key Takeaways
Before starting:
- Choose the right template for your engagement type
- Define clear, measurable objectives
- Be explicit about scope and exclusions
- Set appropriate ROE for your risk tolerance
During planning:
- Use the AI agent to refine your plan
- Validate with the pre-planning checklist
- Add known credentials and targets before execution
- Review the flow view to understand the execution path
During execution:
- Monitor progress through the Execution Monitor
- Document findings as you discover them
- Capture evidence immediately
- Track progression through the Kill Chain
For reporting:
- Generate reports throughout the engagement
- Use different formats for different audiences
- Include comprehensive evidence
- Link findings to objectives
Next Steps
Now that you understand the complete workflow, explore these topics:
Essential workflows:
- Setting Objectives - Deep dive into objective definition
- Managing Scope - Advanced scope configuration
- Planning with AI - Maximizing the planning agent
- Execution Monitoring - Real-time operation oversight
Data collection: 5. Target Management - Adding and tracking targets 6. Credential Collection - Storing discovered credentials 7. Evidence Collection - Capturing proof and maintaining chain of custody 8. Finding Documentation - Writing quality findings
Tracking & Analysis: 9. Kill Chain Tracking - Understanding attack progression 10. Network Topology - Visualizing infrastructure 11. MITRE ATT&CK Mapping - Technique coverage
Reporting: 12. Report Generation - Creating deliverables 13. Notes - Documentation and observations
Tips for Success
Engagement setup:
- Start with a template and customize
- Set objectives in the wizard (easier than adding later)
- Be specific about scope and exclusions
- Include emergency contact information
Planning:
- Take time to refine the AI-generated plan
- Challenge assumptions and ask questions
- Visualize the workflow with Flow View
- Add known intelligence before execution
Execution:
- Document as you go, not at the end
- Capture evidence immediately after success
- Link findings to targets and objectives
- Monitor Kill Chain for balanced coverage
Reporting:
- Generate multiple report formats
- Write for both technical and executive audiences
- Include comprehensive evidence
- Review before delivery
Alternative Paths
For advanced users:
- Use Quick Start to create minimal engagements
- Skip templates and build from scratch
- Use Manual operating mode for complete control
- Edit objectives and scope dynamically during execution
For collaborative teams:
- Create custom templates for your organization
- Share templates between team members
- Use Guided mode for consistency
- Export and import engagement configurations
Getting Help
If you get stuck:
- Use the Assistant - Navigate to Headquarters → Assistant and ask questions
- Review feature docs - Detailed documentation for every feature
- Check the interface guide - Interface Overview
- Follow the workflow guide - Recommended Workflow
Related Documentation:
- Quick Start Guide - Fastest path to get started
- Interface Overview - Complete UI reference
- Workflow Guide - Best practices for engagements
- All Features - Complete feature documentation
You're now ready to create and execute professional red team engagements with StrikeKit!